Roof Wall Flashing Techniques

Pin On Framing

Pin On Home Improvement

Pin On Roof

Pin On Building Science

Pin On Roof

Pin On Roof Flashing

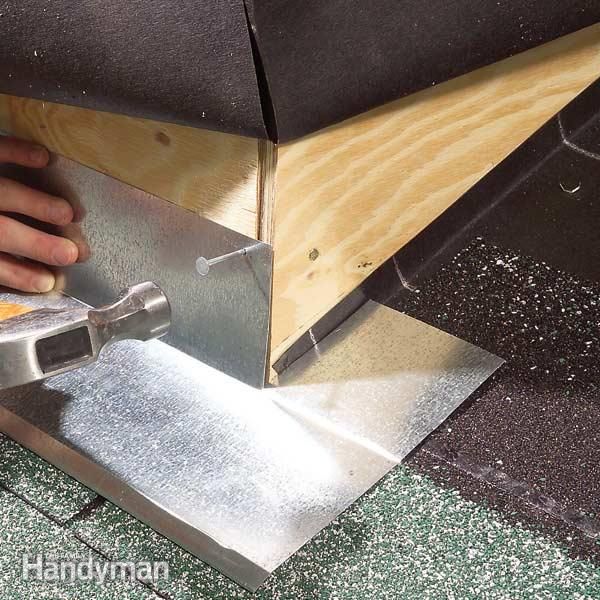
Add shingles and additional step.
Roof wall flashing techniques. Proper roof wall flashing example. The edge of the roof has thin metal flashing that helps water drip off the roof without damaging the home or causing a leak. Always check the roof flashing and the condition of the shingles whenever you clean your gutters. Run the base flashing 4 to 5 in.
Bend the flap down and nail along the top edge. All exterior wall coverings whether it is wood siding vinyl siding brick or stone veneer stucco etc. Must be kept up off the surface of the roof a minimum 1 some manufacturers of exterior wall coverings require. Open valleys have metal flashing to protect this critical area of the roof.
There have always been problems with the flashing details at head walls rake walls and chimneys especially if stucco brick or stone veneer is used. Notch the first step flashing leaving a 1 in. To install the roof wall flashing above the builder bent the top edge of the flashing into a 90 degree lip about 2 cm in width. Nail along its upper edge.
Flap to bend around the front of the dormer. The best way to learn proper flashing techniques is to spend time with an experienced craftsman as he installs a complete roof. While some skylight manufacturers include flashing in their products sometimes roofing professionals have to create it or purchase it separately. Roof to wall flashing.
To emphasize the importance of proper roof and deck flashing and to provide typical and enhanced flashing techniques for coastal homes. 23 roof to wall and deck to wall flashing home builder s guide to coastal construction page 1 of 3 purpose. That being said here are a couple of flashing tips that even an inexperienced homeowner should make note of.

Pin On Gardening

Heavy Membranes At Valley And Roof Deck Penetrations Building America Solution Center Roof Repair Diy Roofing Roof Repair

Pin On Water Proofing

Pin On Roof Design

Pin On Roofing Ideas

Pin By Ks B On Porch
Pin On Remodels And Renovating

Pin On Home Repair

Pin On Construction

Pin On Roofing Details

How To Fit Lead Soakers Lead Soakers For A Wall Or Chimney Stacks Youtube Slate Roof Roof Roof Plan

How To Roof A House Diy Roofing Roofing Home Construction

Pin On Home Building Repair Or Rebuild

Pin On Backyard Planning

Pin On Details

Pin On House Exterior

Pin On Your Pinterest Likes

01 030 0751 Jpg 720 549
Https Encrypted Tbn0 Gstatic Com Images Q Tbn 3aand9gcqfwuteol9cqcfhrvz4ubixixg8klwbqrunasts9ammzo2vd5m6 Usqp Cau

Pin On Roofs Roofing

Pin On Build This

Pin On For The Home

Pin On Cheap Roofing Maintenance

Roof Problems And What To Do About Them Cheaphomeremodeling Roof Problems Home Repairs Diy Home Repair

Pin Em Roof Tie In

Pin On Obrobka Drewna

Pin On House Remodel

Pin On Handyman

Pin On For The Home
Pin On Contractor Tips

Pin On Roof Details

Pin On Desert Nesting

Pin On Building Maintenance

Pin On Excellent Exteriors

Pin On Roofing

Pin On Home

Pin On Diy Repairs

How To Install Metal Roofing Decor Dezine In 2020 Diy Metal Roof Metal Roof Corrugated Metal Roof

Pin On House Plans

Pin On 9879 Amberley Drive

Making A Skylight Leakproof Skylight Roof Repair Green Roof

Pin On Construction

